Create snapshots of effect stacks to navigate between different states quickly. Apply an entire snapshot or only update user-selected components. Manage your snapshots with intuitive tools like search, list filtering, tagging, and directory jump-list, to create a library or project-specific settings for fast itterating of ideas.
_________________
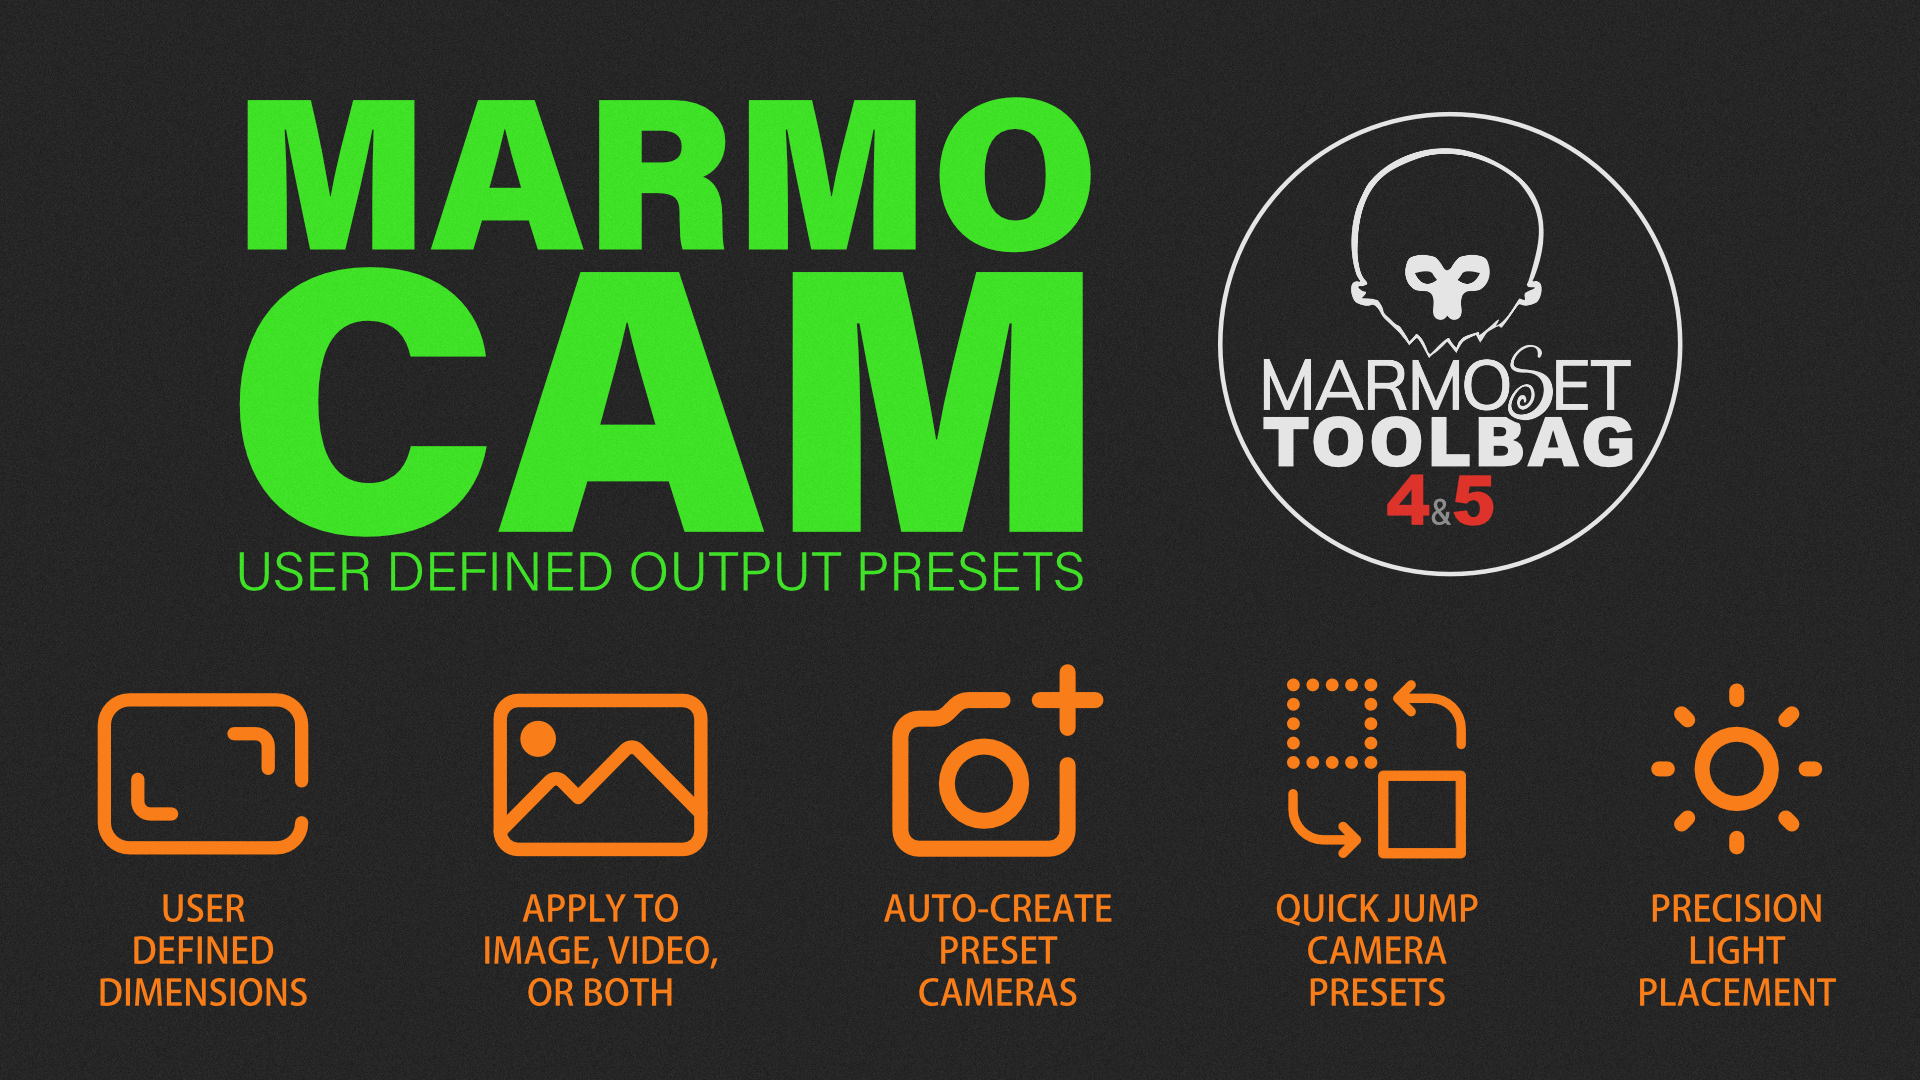
MamoCam enables the quick creation of user-defined dimensions for your project in Marmoset Toolbag 4 and 5. You can easily change the render dimensions for images, video, or both. Additionally, MamoCam can create a camera for each preset, allowing you to switch between different camera angles with a single click, as it automatically sets the active camera to the newly created one.
After creating all your cameras, toggle the preset list to display only the cameras in the current project. This will help you quickly navigate between cameras and their corresponding resolution.
New! Light linking lets the user quickly attach a camera to a directional light which allows the user to direct the light by looking through the camera. After the light is placed, unlink the light to return it to the original scene hierarchy.
_________________
Offset your layers in traditional ways or take them to the next level with patterns that will stagger your layers based on comp position. Includes options to sort your layers all in a compact UI.
_________________
Ease your keyframes in Adobe After Effects quickly with a compact UI that packs a powerful punch despite its adorable appearance.
One slider, six easing modes, so many possibilities.
_________________
Keep your After Effects timeline organized by trimming layers to a variety of attributes such as keyframes, parents, children, matted layers, zero opacity, selection, the layer above, and the layer below.
Trim the entire clip, just the in-point by holding CTRL or just the out-point with ALT.
_________________

Create a gallery of film profiles for Dehancer Pro to preview all the film profiles easily in Adobe After Effects.
Get 10% Off Dehancer Pro with code: FRESHMOGRAPH
Learn how to use the script here: https://youtu.be/EiWyHowupFw
_________________

Pre-composing layers in After Effects is unavoidable at times, but now you can access pre-composed layers to create mattes, rearrange layer order, embed mattes in MOGRTs, or add multiple MOGRT versions in one file all while keeping your project procedural.
• Each pre-comp can have six groups and six toggles.
• Automatically add locked layers and mattes to groups.
• Controls to add entire groups, overwrite groups, or add selected layers to an existing group.
• Adjustment layers can be added to toggles, which allows the users to apply adjustment layers to a layer or groups of layers instead of the entire comp.
_________________
Faux Parent will give you more power than normal parenting and you decided how much control the parent can have over the child.
• Position-Parent: XY, X Only, Y Only, XY Inverted, X Only Inverted, Y Only Inverted
• Scale-Parent: XY, X Only, Y Only, XY Inverted, X Only Inverted, Y Only Inverted
• Rotation-Parent: Standard, Inverted
• Opacity-Parent: Standard, Inverted
• Add a delay to any Faux Parent mode.
• Faux Parent allows you to use a different parent for each property (position, scale, rotation, and opacity).
... and so much more! Check out the product page for more details.
_________________
Drive allows the user to control one property with another. For example, you can rotate a layer based on the x position of another layer. Change a particle emitter rate based on the scale of a layer. Change the hue of a layer based on the opacity of another layer. Okay, you get the idea. If you're a Cinema 4D user, it's similar to the Driver/Driven function.
The advantage of using Drive is creating animations with only one property keyframed for several animated layers that work together. For example, animate a car's position and have the wheels automatically rotate to match the easing of your position keyframes.
_________________
Essential Namer keeps your project organized and easier to navigate with less work by automatically naming properties as they are added to the Essential Graphics panel. Essential Namer is also a great tool to streamline the process of making motion graphics templates (mogrt) for easy navigation by the end user.
Easily add any transform property of selected layers or add any selected property from effects and shape layers.
_________________

Solids and shape layers are common layer types for backgrounds in After Effects. However, if you change the size of your comp you also have to change the size of your background.
This script will allow you to create a background that is always the correct size by applying the effect Solid Composite to a blank shape layer.
_________________
Retrieve the global position of a child layer. Apply the preset to the parented layer and a Point Control will be applied that displays the global position of the layer.
Since the position values of a child don't change when the parent is animated, making it difficult to utilize the child's position. Global Position allows access to the position value regardless of how long your parenting chain is.
_________________

Anchor Pin for Adobe After Effects allows you to set the anchor point on text layers and have it stay in place even if you change the font size. By default, After Effects will ignore the anchor point on text layers and scale the layer from the bottom when adjusting the font size.
This behavior makes for unnecessary adjustments to your layout, especially if you're creating MOGRTS where the client has access to font size. Lock your anchor points down with Anchor Pin.
_________________
Handy Renamer is the fastest way to name layers is Adobe After Effects for character animation.
I got tired of renaming layers in After Effects for my characters. I tried different scripts that I found online, but I couldn't find one that could perform the task quickly and not break existing expressions.
So, I created Handy Renamer. What makes Handy Renamer a great tool for character animation? Find out on Gumroad.
_________________
Quick Color is designed to work as a standalone tool or with KBAR. Quickly colorize transform properties (anchor point, position, scale, rotation, orientation, and opacity) keyframes, which allows for quick navigation of your animation timeline. Choose your keyframe colors by setting the color index values in the standalone preferences or the KBAR argument. Watch the product video to see how to complete the setup.
_________________

Need to make measurements in your comp? M Stick is the tool for you. Measure the total distance between any two points, x distance or the y distance.
_________________
Add great-looking grain to your After Effects projects with Dynamic Grain. This product is meant to be used in conjunction with Ray Dynamic Texture. If you don't own the script, you can find it here.
Dynamic Grain is a set of nine non-destructive, resolution-independent grain presets that can be dialed in to meet your project needs. The grain textures can be applied as an effect preset or a texture layer.
_________________

Autopacity is a pseudo effect for Adobe After Effects CS6 or higher. It will automatically fade a layer's opacity in or out. The layer's opacity will fade based on the following:
• Frames
• Markers
• Layer above in point/out point
• Layer below in point/out point
_________________
Auto db fader is a pseudo effect for Adobe After Effects CS6 or higher. It will automatically fade the head and/or tail of your audio layer. The layer will fade based on the following:
• Frames
• Markers
• Layer above in point/out point
• Layer below in point/out point
_________________
Proximity for Adobe After Effects allows the user to trigger animations based on the distance of a trigger layer, which can be any After Effects layer. The main Proximity preset has the following controls:
• Trigger Layer: Select any layer in the comp to trigger the animation
• Position: Move XY, X only, Y only
• Scale: Scale XY, X only, Y only
• Rotation: Min and Max Rotation & Target mode (the layer always rotates toward the trigger layer)
• Opacity
If you want animation properties not found in a layer's transform section, use Proximity Custom to drive any keyframeable property.